Why Your Milk Bottles Shouldn't Live on a Sunny Windowsill

Wait — Displaying Bottles in Daylight Actually Damages Them?
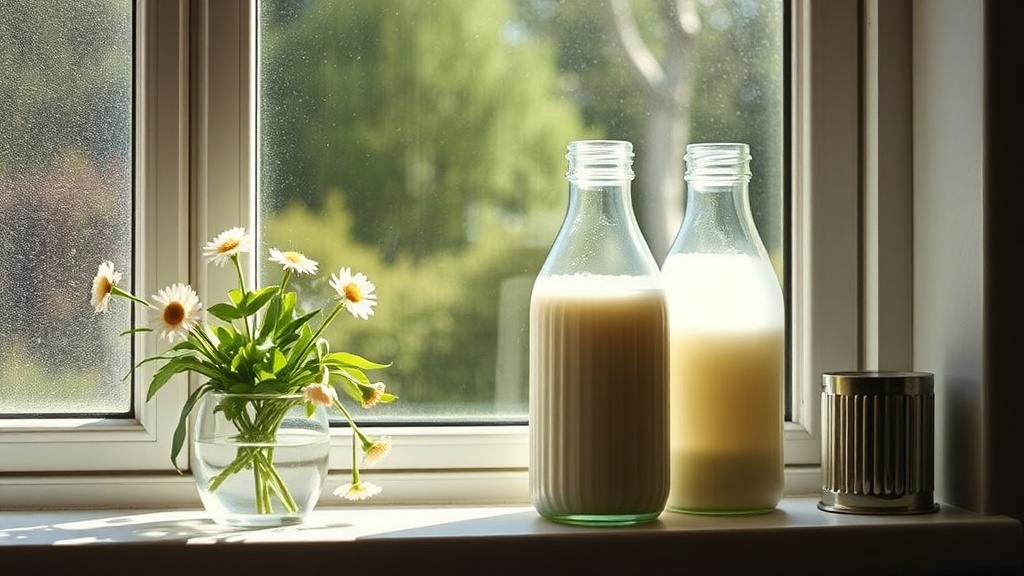
Most collectors think the best way to enjoy a milk bottle collection is to line it up where the light hits — kitchen windowsills, glass-front cabinets facing windows, or shelves bathed in afternoon sun. It makes sense on the surface. You want to see the embossing, admire the pyroglaze colors, maybe catch that satisfying glow through the antique glass. But here's the problem — ultraviolet light is slowly destroying your bottles, and heat from direct sun accelerates chemical changes in the glass and any remaining paper labels or caps.
Old milk glass wasn't formulated with UV stabilizers. Those beautiful aqua-tinted bottles from the 1880s? The manganese dioxide that creates that color can shift to amethyst under prolonged light exposure — which some collectors actually want, but it's still damage. Clear bottles can develop a sickly yellow tint. Paper labels fade, become brittle, and flake away. And if you're storing metal caps nearby, temperature swings from sunlight cause condensation inside those caps, leading to corrosion that spreads to the bottle lip. The misconception isn't just about aesthetics — it's about believing that visibility equals good storage.
What's the Right Way to Store Bottles Long-Term?
The sweet spot for milk bottle storage sits between 65 and 72 degrees Fahrenheit with relative humidity around 45-55%. Basements are tempting — too tempting, actually — because they're cool and have space. But most basements run too humid, and that moisture finds its way into every crack, encouraging mold on labels and oxidation on metal components. Attics are worse — temperature swings of forty degrees in a single day stress the glass and destroy caps.
Interior closets or dedicated shelving in living spaces work best. You want stability more than anything else. Glass doesn't "breathe," but it does react to its environment — especially if it has internal stress from manufacturing (common in hand-blown bottles) or existing micro-cracks. Shelving needs to handle significant weight, too. A full quart milk bottle weighs over two pounds. A shelf of thirty bottles is supporting sixty-plus pounds, and that's before you factor in the dynamic load of someone walking past or a door closing. Use shelving with center support brackets every three feet, minimum.
Organization matters as much as environment. Alphabetical by dairy name seems logical until you realize you're handling bottles constantly to maintain order — and every touch risks a drop. Chronological by decade works better for most collectors, since you'll mentally group bottles by era anyway. But the real pro move? Organize by frequency of access. Your daily rotation or research subjects go on middle shelves where you can reach them without stretching or bending. Rare pieces you rarely examine go higher. Display pieces in protective cases go where you can actually see them — just not in direct light.
How Do You Protect Caps and Smalls Without Losing Them?
Bottle caps, closures, and "smalls" (the industry term for dispensers, carriers, and accessories) present their own storage puzzle. They're small enough to lose in a drawer, varied enough that uniform containers rarely work, and reactive enough that tossing them in a jar together can cause damage. Steel caps from the 1930s and 40s will rust if they touch moisture. Aluminum caps from the 1950s oxidize differently — they develop a white powdery corrosion that transfers to anything they contact.
The solution is compartmentalization with materials that won't react. Acid-free polypropylene boxes with adjustable dividers work well for caps. Avoid PVC — it releases hydrochloric acid over time, especially in heat. For larger smalls like cream separators or bottle carriers, archival-quality corrugated boxes (the kind museums use for artifact storage) provide structure without off-gassing. Label everything on the outside. Not just "miscellaneous caps" — that's how collections become unmanageable. Be specific: "Steel caps, 1940s, Illinois dairies" or "Aluminum closures, 1950s-60s, various states."
For caps you want to display, consider shadow boxes with UV-protective acrylic fronts — not glass, which can trap moisture against the metal. Position these on interior walls, away from bathrooms or kitchens where humidity fluctuates. And never glue caps into displays. It destroys their value and can cause chemical reactions between adhesives and metal. Use archival mounting corners or reversible putty instead.
Can You Display Bottles Without Hiding Them Away?
Absolutely — you just need to be strategic about it. Rotating displays solve the visibility problem while protecting your collection. Keep your storage system organized and accessible, then select a small group — maybe six to twelve pieces — for active display. Change them quarterly. This gives every bottle a "rest" period in stable storage and keeps your display fresh. It's also an opportunity to inspect each piece when you swap it out, catching any developing issues before they become serious.
For display locations, choose interior walls without windows, or walls that only get indirect light. If you must use a room with windows, position display shelving perpendicular to the light source rather than facing it. UV-filtering window film helps — it's not perfect protection, but it blocks 99% of damaging rays and costs far less than replacing a rare bottle. Just remember to replace the film every few years as it degrades.
Lighting for displays should be LED, not halogen or incandescent. Heat output matters — a halogen track light can raise local temperature twenty degrees above ambient. LEDs run cool, and warm white (2700K-3000K) actually shows off milk glass better than daylight-balanced bulbs, which can make white bottles look blue-gray and harsh. Position lights to avoid glare on curved glass surfaces — slightly above and angled down works best.
How Often Should You Inspect Stored Bottles?
Set a schedule — seriously, put it on your calendar. Twice-yearly inspections catch problems while they're still fixable. Look for developing haze (indicating moisture issues), new chips at contact points (indicating overcrowding or unstable shelving), label deterioration, and cap corrosion. Handle each piece with clean, dry hands or nitrile gloves, and use this time to update your catalog — whether that's a spreadsheet, database, or physical log.
During inspection, rotate bottles slightly if they've been resting in the same position. Even stable shelving can develop slight sag over years, and bottles sitting in the same spot develop wear patterns on their bases. A quarter turn redistributes the load. Check that any padding or supports (museum wax, archival foam, felt pads) haven't degraded or become sticky. Materials age, and a support that was inert five years ago might be off-gassing now.
The goal isn't to turn your collection into a museum vault — it's to ensure that when you want to enjoy a piece, study it, or eventually pass it along, it's in the same condition you found it (or better). Good storage doesn't hide your collection; it preserves your options.
"The best storage system is the one you'll actually use. Fancy archival materials don't help if they're too complicated to maintain. Start simple, stay consistent, and upgrade as your collection grows."
For more on identifying bottle types and manufacturing methods that affect how you should store them, visit the Society for Historical Archaeology. The National Park Service offers detailed guidance on glass preservation in museum contexts. And for specific information on Midwest dairy history and bottle production, the Wisconsin Historical Society maintains excellent research resources.